Thursday, June 28, 2012

A Brief Hiatus on the Lake

Welcome


Self-Explanatory!

Shed, Kayaks & Canoe


Sometimes it is necessary to take a good break.

Monday, June 25, 2012

What Does "Trim a Pot" Mean?

You're at your potter's wheel. You make the bowls. (Or vases. Or plates. Or jars. Or most anything.) The clay is nice and responsive to your touch, and you succeed at making the form you intend. Still, the odds are good that you needed to leave some extra clay at the bottom of the piece (the "foot"). A little extra at the bottom helps you lift the piece off the wheel without distorting it. It gives the wet clay a sturdier base.

It does not look very nice, though. Hiding inside it is the true profile of the foot. These two bowls were thrown the day before I took the picture. They are firming up, but not dry. Call them "leather hard."
Notice they are not very graceful.

Now I put one back on the wheel, upside down and as exactly in the center as possible. I "trim away" the excess clay. The bowl turns and I move various sharp tools over the surface to refine the form, creating the finished foot that is longing to be revealed. I remove it from the wheel and put on the next bowl. When they are finished (though still raw clay, not having been heated in the kiln and not having been glazed with color), they look quite a bit different.
(Note: The clay color looks different because I photographed the trimmed bowls in much better light.)

The one on the right is the same bowl as the one on the right in the upper photo, the one on the left the same as the one above on the left. Quite a difference, isn't it?

When I "threw" the bowls, which is the term for making them on the spinning potter's wheel, I left a nice thick bottom, about 3/4", with the intention of making a raised foot. A foot like this, narrow and well defined, raises the bowl from the table surface, showing its graceful profile to advantage. A shorter, wider foot would give the bowl a more utilitarian look. It's all valid, all choices I have to make before I slap the clay down onto the wheel. I plan this sort of thing, in fact, while I'm weighing out and kneading up the amounts of clay I will be using that day.

So now you know what it means to "trim a pot!"

Thursday, June 21, 2012

Made New Pots All Week

Nothing like a good week at the wheel.
Some rawware:
I had shown this vase on my FB pottery page before I paddled the sides or cut the four feet. Came out nice. I will probably use the sides as a flat canvas for glaze work.


As long as I was cutting feet, I kept doing it. (Again, you may have seen these in a photo on my FB pottery page, drying upside down, outside on the railing.) These are small, cute jars 4", 5", 5.5" and 7" tall. They are freely thrown for a nice loose vibe. I covered them with plastic because, if I get the chance before they are dry, I think they are asking for fat little lug handles.

Some bowls:
I also threw and trimmed a 20" round platter with a nice, beefy rim- maybe to be turned into a Seder plate, not sure. Ten lbs. of clay, biggest plate I've ever thrown. I don't know how to photograph a plate that big. It will be much more interesting once it's been glazed, anyway.

Studio reno is in progress. What a mess. But what promise.

Monday, June 18, 2012

Tulipieres Stage 3- Vases of Another Name

A satisfying morning putting black underglaze on the tulipieres and cutting through it with a tiny carving tool, aka stage 3 of the 4-step process.
Tulipiere 1, One Side
 And the other side of the same vase:
Tulipiere 1, Second Side
Then:
Tulipiere 2, One Side
Tulipiere 2, Second Side

Moving on:
Tulipiere 3, First Side

Tulipiere 3, Second Side
And one more vase:
Tulipiere 4, First Side
Tulipiere 4, Second Side
They will stay under plastic and dry slowly, to even out moisture loss and prevent stress cracks from forming.


Thursday, June 14, 2012

Symposium's End: "'Bye for now"

Like the last day of senior year at college, the last moments at the clay symposium were hard. Too many goodbyes of new friends. How hard is it to leave people you just met? Am I being silly?
Here are Marita and Liz, and me.
Marita, Mimi and Liz (left to right)
We are all three wearing necklaces by Marita. It's a gesture of friendship from a lovely lady to the two of us, and to others here, as well. We each chose our pendant the second morning, and yesterday at breakfast, Marita presented them, strung and with her tag: Earth2Ware by Marita Early. Liz and I were delighted to be recipients. We were also delighted to find each other to sit with at meals. It is a joyful thing to meet people like this, and I am hereby counting a blessing. I hope to see them back here next year, but I also hope to exchange thoughts and photos over the course of the year with them.

Potters in small studios spend a lot of time alone, and when we make friends with other potters, they don't usually live next door. They are, in fact, hard to find. Well, voila- two here, and numerous more to talk to and sit beside.

I would never have met these wonderful women, or the other friendly potters, sculptors and poets with whom I have had such good conversations, had I not come to Virginia for these four days. 

As for all that I've seen and listened to at the symposium, my notebook is not just full of notes on the thoughts, techniques and quotes from the presenting clay artists, it also contains notations of books I want to read, improvements I want to make to my kiln, and even a design change to the layout plan for the new shelves I want to build in The Gallery Downstairs. And all the pottery I have looked at and touched (dude, it was an informal exhibition, wasn't it? And no cameras..?) have given me a deepened discontent with my glazes, that desire to add to the palette and to experiment with layering colors and varying the textures. 

More than anything, my personal motivations and aesthetic considerations have had a bop on the head this week. I see some gravitational shift in my work ahead.

So here's to Liz and Marita, Hollins University, Donna Polseno (artist, teacher and symposium coordinator) and all the people who made this symposium so good. Or as Mom used to say at the end of each phone conversation, "Bye for now."

Wednesday, June 13, 2012

Symposium: Women Working with Clay, Day 3

I am overwhelmed by this day. Too much to assimilate means too much to talk about. Photos, instead.


Donna Polseno's thrown & altered covered pot

Another of Donna's...

Ellen Shankin's covered jar- I loved seeing this made in all its stages.


Seeing Ellen add and form this handle was actually a highlight of my day. 


Mary Barringer's Bowl (love this shot of it)


Lisa Clague, adding a drape of slip-covered fabric to her sculpture.

Tip Toland's sculpture grew and changed- amazing to watch.

But another highlight of my day was when my new friend Marita Early gave me a salt-fired pendant she'd made, strung on a cord. I was touched and delighted to wear it.


Tuesday, June 12, 2012

Symposium: Women Working with Clay, Day 2

Today was FULL.

First thing was introductions. We all stood in turn and said our names and something about ourselves. We are only 44 attendees, so this was easy. It's always fun to meet other potters.

After that, our five presenters demonstrated technique. They were in two studios, and we could come and go as we wanted to see whomever in either room. They did the first part today in the morning, and the second part after lunch.
Lisa Clague
Lisa Clague built the first part of her sculpture from big, flattened coils of clay. As she builds the piece she draws on it, butters the surface with slip in places, and sometimes (see the small sculpture at her elbow) incorporates metal objects. She will add the head tomorrow. I think it will surprise you.

Tip Toland
Tip Toland built much of the head and shoulders of a figure. She will continue tomorrow, too. Along the way she explained proportion and structure of the human head. She was so funny and charming, it will be a contrast to see the finished piece, which will tend, she told us, toward melancholia. She added that her sculpture tends toward the dark side. If you find her work online, you will know what she means.

Ellen Shankin
In the second studio, Ellen Shankin threw pots. Throwing is the technique closest to my heart, which I use most. but every potter has his or her own influences and style, and it is really a blast to see Ellen's. Here are some of the Phase 1 pots, to be assembled or altered or added to tomorrow in Phase 2:

In the same studio as Ellen Shankin, Mary Barringer worked on slab pieces. 
Mary Barringer

Mary doesn't use much color, but builds up lots of surface intensity with texture and thin washes of glaze. Her forms are simple and rely a great deal on individual nuance to give them strength. Throughout her presentation, she tried at length to talk about her objects and their meanings. It is difficult to express the ideas within objects. As editor of Studio Potter, she is always thinking through ideas that frame the "language of clay." I found it challenging to assimilate some of her ideas. I am not used to thinking in this way.

Donna Polseno
While Ellen and Mary were two in this session in the first part of the day, Donna Polseno joined them after lunch to make three presenters in this studio. Donna teaches at Hollins University, and organized this symposium. She slipcasts her forms (from original pieces she makes herself) to obtain the right shapes, then adds to the cast pieces with additional parts. These lively forms are sometimes vessel, sometimes form, and sometimes a hybrid. 

After this, the whole group had a writing session where we wrote an ode to something. Mine was to my studio, and boy, does it need revising.  I missed most of this, as it happens, because I was so tired from all the information I was absorbing that I slipped out to my room and took a brief nap.

In the evening, after dinner, the presenters gave a slide show with photos of their work. It was very telling to hear influences that formed phases of their potting lives. I was heartened by something Ellen Shankin said, in reference to the shows of a group of potters in Virginia, Sixteen Hands, of which she is part. She said, "We were all 25 years into this before we tried to get people to find us." 

Hmm. I started my studio in 1987. It's a happy quarter century in clay for me. Who knows where next year will find my work?


Monday, June 11, 2012

Symposium: Women Working with Clay, Day 1

What is more convivial than a meeting of minds to discuss a topic we are all passionate about? There is no point in being shy and reserved. So I'm yawping my potterly head off to folks from all over the place, and they are doing just the same with me. We are at Hollins University, in Roanoke, Virginia, at a Women Working with Clay symposium. Just to enrich the atmosphere still more, we coincide with a poets symposium. The conversations have been so good. But I will save discussions with the poets perhaps for another day, or another blog.

I took some pictures at the end of the day, of pots by a couple of the people who will discuss and demonstrate techniques tomorrow, Wednesday and Thursday. The old conundrum exists. How am I to take even adequate photos (2-D) of these 3-D items? They are never as good in photos as they are in person. But here are a few that I loved, anyhow.

I walked into the exhibition room and fell weirdly in love at first sight with this wonderful pagoda-ish covered jar by Ellen Shankin. She kind of blew me away in general with her work.
(Pardon the awkward shadow. I couldn't take the time and space to set up the shoot.)

Then there were these by Donna Polseno:

They are two of the numerous beauties she has there. Donna teaches at Hollins, and coordinated the symposium.

More tomorrow!

Thursday, June 7, 2012

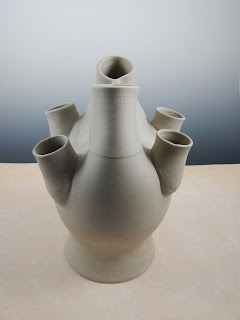
Tulipieres, Part II

I did mention that the tulipieres had only gone through one step in the creative process, though you may have thought you "got the picture." 

To quote Yogi Berra, “It ain’t over till it’s over.”  So…it ain’t over. Welcome to stage 2.

Tulipiere 1, now with “tulip spouts” attached, two views:

tulipiere 1, stage 2, side view
tulipiere 1, stage 2, front view


 Tulipiere 1 started with two rim openings, and now has four places to put flowers. Tulipiere 2 started with three openings, which have now grown to seven:


tulipiere 2, stage 2, side view

They are changing from thrown pots into near-sculptural forms.


tulipiere 3, stage 2
Some of you commented on tulipiere 4, below, liking it as it was. I wonder what your impression is now.

tulipiere 4, stage 2, front view
And look how tulipiere 4 changes when viewed from the side:
tulipiere 4, stage 2, side view


Here they all are in a group. Tulipieres, stage 2. What do they suggest to you? They look like sea forms to me, or..?


And that is the end of stage 2. 

Next, stage 3, which will bring texture and color to the surfaces. Tightly covered, these will wait to go to stage 3 till I get back from the clay symposium I’m attending next week.

Late next week, thoughts and photos from the clay symposium! And then, when I get back into the studio the week after, stay tuned for photos of these tulipieres, stage 3.

Monday, June 4, 2012

Tulipieres, Status Symbols of the 17th Century

 
Tulips came to Holland from Asia. A tulip bulb cost at least as much as your ox, when this beautiful flower was new and novel. And if you were Someone, you needed to upstage your peers by exhibiting your incredibly unusual and extremely expensive prize in an appropriately over-the-top container.

You put it with its fellow tulips (because you were wealthy enough to have enough for a bouquet) in a fancy-shmancy vase made just for them.

Your vase would probably have had several levels, like a layer cake, each layer with holes, tubes or spouts in which to insert the tulip stems. Since your tulips were still alive and still bending towards the light source even after being cut, they might keep on bending till they keeled right over. So you constrained the stem to the holes or narrow tubes in your special vase, so that they would stay upright. 

My take on tulipieres began with vases, thrown on the wheel (2600 grams of clay each), altered by being squashed inward a bit, with the rims crimped into two, then three, then four openings. I have a feeling they may get more openings as I make more tulipieres…

Phase one. Just thrown. Waiting to firm up a bit before I start adding appendages to them.

first tulipiere, thrown round then pushed inward, with 2 rim openings

2nd tulipiere, flared, flattened a bit, with 3 openings

3rd tulipiere, flared shape, flattened form, with 4 rim openings


Remember, this is just the interesting first part of the process.

Tomorrow: the tulipiere shapes get evened out, and begin to sport spouts.

Friday, June 1, 2012

Head-to-Toe, a Sales Profile: Susan James

  
     When I do a show, it’s fun and very informative to meet other artists and crafters. At the JFS show May 6th, I met Susan James, who was showing and selling her beaded jewelry.

     I learned that Susan’s business actually encompasses two crafts. You can check out her jewelry and also the hats and capes that she crochets, at www.design-site.net/headtotoe.

     I have a hard enough time pulling together one category of handmade objects. I interviewed Susan for this blog to find out how and why she works with two.

     Susan said, “I started selling original design jewelry at the Aspen Saturday Market in 2001. It's a long selling season--from mid-June to mid-October.” 


     She reflected on the seasonal aspect of her sales. “When the weather got cool in September -- winter comes early to the Rockies -- I noticed the customers were too bundled up or chilly to try on jewelry, so my sales dropped."

     "I needed a fashion accessory product that could take me through the fall selling season in Aspen. Taught as a girl by my grandmother to crochet, my primary experience had been making afghan blankets for family and friends, and I hadn't crocheted in years. I started experimenting with shaping hats, and after pulling out many errant rows of crochet, I developed a line of hats for adults and children.” (Note: She also does capes. These are two of her customers:)


     Impressed by Susan’s perseverance, I wondered how she could make the hats pay off. I realized by her answer that, at least to a certain degree, she thinks through who she is selling to, before she even creates her inventory. She bases her analysis partly on prior sales, but also on certain external factors.

     “Over the years, three things changed my hat-selling business. The first was global warming. In recent seasons, Aspen stays hot until the middle of October. So I was selling winter hats in hot weather for four months! The second was that certain styles sold way better than others. And the third was the Great Recession, which caused shoppers who used to buy colorful caps for every kid in the family and hats for all the adults to pull back their purchases to perhaps one token hat as a souvenir.”

     So how did Susan adapt to meet these challenges?

     “This winter," she told me, "I designed a new cotton fedora, which was instantly popular, and works well in warm weather climates all year round. And I narrowed the collection to include only the few top-selling styles. The warmest designs I only sell at a store in Aspen during winter season. The cotton hats, flower headbands, and brimmed winter hats I sell at my booth at farmers markets year-round.”

    She added, “My biggest problem going forward is that I've been crocheting for 6-8 hours a day for so many years, that I've overused the muscle and nerve paths in my neck and shoulders, so now I must limit my crochet to as few hours a week as possible, and sometimes avoid it entirely. Thankfully, my jewelry design business has been growing, so the hat business is supplementary and not primary at this point.”

     As a potter, it was interesting for me to note this challenge, to which I could relate. It is sometimes hard to live with the beating on the muscles, joints and neural pathways, that comes from repetitive motion. I relate to it when my wrists and lower back ache after working too long at the potter’s wheel. If the problem gets bad, it requires that the crafter modify technique, or adjust to making a less body-stressing product, like Susan did.

     Making craft pay is quite a challenge. Thanks, Susan, and hats off to you for sharing your experience.