If I do not have bulging biceps, it is not from lack of trying. Pottery materials and tools are heavy! It's been a big job pulling this together the last two days, but I am at least 75% there.
Yesterday, I moved my wheel from its old spot to a new one, My trusty Lockerbie wheel, which I've had since 1985, has a 90 lb. flywheel at the bottom, and its frame is made of cast iron. I found it helped to use old bits of vinyl floor tile below the 3 feet of the frame, to get it started moving. I had washed the floor (needed it- sloppy buckets of glaze used to live here) and I managed to slide it into place along the damp floor. Oof.
 |
| First thing in place is my kickwheel! |
Clay boxes were everywhere. My husband helped me move the slab roller to its new spot this morning, and then stowed 500 lbs of clay under it. There is room for 900 lbs of clay:
 |
| 2nd thing in place is clay and slab roller! |
This is my craft cabinet, full of beads and epoxy resin supplies and more. It stood (up until now) sort of nowhere, in the midst of the basement, with other junk:
Son of a gun was full of supplies and way heavy, but I stuck a couple of putty knife blades under the front edge as slides, and pushed it bit by bit out of what will be my gallery space, and into its new place. The crafts cabinet now lives between the glaze-colorants cabinet (white), and the wall of buckets and bags containing my more basic glaze ingredients.
 |
| Supply cabinets make friends |
Oxides and colorants:
 |
| Cobalt carbonate, Red iron oxide, Mason stains and much more |
 | |
| Beads, wire, findings, glues, epoxy resin supplies, tools and more |
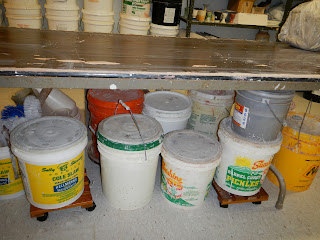
Too bad I didn't take a photo of the glaze bucket mess before I moved it. It lived under a table made of an old door, which sat on two filing cabinets and stood where the slab roller now lives. I first had to shlep out the wet glazes, get rid of those that don't work for me any more, and wash out still-useful buckets. It was a sloppy job, but done now. Here is the mid-stage of cleanup:
And here are the glaze buckets and glazing tools where they belong, now stored under a 7' long table placed in that same area:
On the side wall you can see more buckets. They are dry ingredients, powders used to make pottery glazes from recipes. They used to live on a pallet, three rows deep, making them hard to get at. They contain 25 lbs. of powder each, so it was heavy lifting to get to the ones at the back and at the bottom when needed. Now they are in a single row. No need to move the buckets in front to get the the ones I need. This makes me surprisingly happy:
 |
| Ball clay, flint, kaolin, tin oxide, nepheline syenite, and more. |
 | |
| The new LED lighting is super |
I am banishing mess and creating an orderly workspace. There is still plenty to do, but the end is coming into focus.


I would recommend that folks bring in or cover the garden pots in winter. Being porous, they will hold water. It will expand when the water becomes ice, and the pottery will suffer from it. True whether glazed or not, in my experience, and whether the pots are fired to a mature clay temperature or not. My gardens are full of shards from commercial earthenware pottery left out all winter as well as pots I made fired to ^9-10 left out of doors.
ReplyDeleteAnon, thanks for advice based on your experience. I will still make garden pots with that clay. (I will let whimsy be my guide.) Then I will put a few in my garden and see what freezing and thawing will do over the winter. I won't sell any before that unless they come with "winter indoors" instructions.
ReplyDeleteI can't wait to see the finished studio.
ReplyDelete